Showing posts with label 18w. Show all posts
Showing posts with label 18w. Show all posts
Thursday, October 23, 2014
Build a 18W Audio Amplifier Circuits Diagram
18W Audio Amplifier Circuits Diagram

Amplifier parts:
P1_____________22K Log. Potentiometer (Dual-gang for stereo)R1______________1K 1/4W ResistorR2______________4K7 1/4W Resistor
R3____________100R 1/4W ResistorR4______________4K7 1/4W Resistor
R5_____________82K 1/4W ResistorR6_____________10R 1/2W ResistorR7_______________R22 4W Resistor (wirewound)
R8______________1K 1/2W Trimmer Cermet (optional) C1____________470nF 63V Polyester CapacitorC2,C5_________100µF 3V Tantalum bead Capacitors
C3,C4_________470µF 25V Electrolytic Capacitors
C6____________100nF 63V Polyester CapacitorD1___________1N4148 75V 150mA DiodeIC1________TLE2141C Low noise, high voltage, high slew-rate Op-ampQ1____________BC182 50V 100mA NPN TransistorQ2____________BC212 50V 100mA PNP TransistorQ3___________TIP42A 60V 6A PNP Transistor
Q4___________TIP41A 60V 6A NPN Transistor
J1______________RCA audio input socketPower supply parts:
R9______________2K2 1/4W Resistor
C7,C8________4700µF 25V Electrolytic CapacitorsD2_____________100V 4A Diode bridgeD3_____________5mm. Red LED
T1_____________220V Primary, 15 + 15V Secondary, 50VA Mains transformer PL1____________Male Mains plug
SW1____________SPST Mains switch
Notes:
- Can be directly connected to CD players, tuners and tape recorders.
- Do not exceed 23 + 23V supply.
- Q3 and Q4 must be mounted on heatsink.
- D1 must be in thermal contact with Q1.
- Quiescent current (best measured with an Avo-meter in series with Q3 Emitter) is not critical.
- Adjust R3 to read a current between 20 to 30 mA with no input signal.
- To facilitate quiescent current setting add R8 (optional).
- A correct grounding is very important to eliminate hum and ground loops. Connect to the same point the ground sides of J1, P1, C2, C3 & C4. Connect C6 to the output ground.
- Then connect separately the input and output grounds to the power supply ground.
Output power:
18 Watt RMS into 8 Ohm (1KHz sine wave)
Sensitivity:
150mV input for 18W output
Frequency response:
30Hz to 20KHz-1dB
Total harmonic distortion @ 1KHz:
0.1W 0.02% 1W 0.01% 5W 0.01% 10W0.03%
Total harmonic distortion @10KHz:
0.1W 0.04% 1W 0.05% 5W 0.06% 10W0.15%
Unconditionally stable on capacitive loads

Monday, October 20, 2014
18W TDA2003 bridge Circuit Diagrams
TDA2003 is a cheap amplifier that is designed to run on single rail power supplies (unipolar). It provides a high output current capability (up to 3.5A), very low harmonic and cross-over distortion.
18W TDA2003 bridge Circuit Diagram

TDA2003 bridge 18W amplifier
TDA2003 can be used as an BCL (bridge amplifier) and car deliver up to 18W.
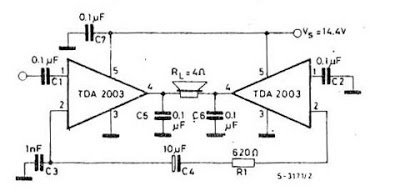
18W TDA2003 bridge Circuit Diagram
TDA2003 bridge 18W amplifier
TDA2003 can be used as an BCL (bridge amplifier) and car deliver up to 18W.
Thursday, September 11, 2014
18W amplifier circuit based on IC HA13118
Here the 18W audio amplifier schema which powered by IC HA13118 as the main component.The type of this amplifier is bridge amplifier since the output line does not grounded.

The supply voltage required for this schema is 8 – 18V DC, at least 1 to 2 Amps. Maximum output power will only be obtained with a power supply of 18V at greater than 2 A, using a 4 ohm speaker. The power supply should be well filtered to reduce mains hum, a regulated supply will reduce noise even further. Extra filtering is unnecessary if operating from a battery supply.
View more explanation about this 18W audio amplifier schema HERE.
Subscribe to:
Posts (Atom)
