Monday, September 22, 2014
Car Battery Charger description and circuit diagram
This charger will quickly and easily charge most any lead acid battery. The charger delivers full current until the current drawn by the battery falls to 150 mA. At this time, a lower voltage is applied to finish off and keep from over charging. When the battery is fully charged, the circuit switches off and lights a LED, telling you that the cycle has finished.
Circuit diagram
Parts
R1 500 Ohm 1/4 W Resistor
R2 3K 1/4 W Resistor
R3 1K 1/4 W Resistor
R4 15 Ohm 1/4 W Resistor
R5 230 Ohm 1/4 W Resistor
R6 15K 1/4 W Resistor
R7 0.2 Ohm 10 W Resistor
C1 0.1uF 25V Ceramic Capacitor
C2 1uF 25V Electrolytic Capacitor
C31000pF 25V Ceramic Capacitor
D1 1N457 Diode
Q1 2N2905 PNP Transistor
U1 LM350 Regulator
U2 LM301A Op Amp
S1Normally Open Push Button Switch
MISC Wire, Board, Heatsink For U1, Case, Binding Posts or Alligator Clips For Output
Notes
1. The circuit was meant to be powered by a power supply, which is why there is no transformer, rectifier, or filter capacitors on the schematic. There is no reason why you cannot add these.
2. A heatsink will be needed for U1.
3. To use the circuit, hook it up to a power supply/plug it in. Then, connect the battery to be charged to the output terminals. All you have to do now is push S1 (the "Start" switch), and wait for the circuit to finish.
4. If you want to use the charger without having to provide an external power supply, use the following circuit.

C1 6800uF 25V Electrolytic Capcitor
T1 3A 15V Transformer
BR1 5A 50V Bridge Rectifier 10A 50V Bridge Rectifier
S1 5A SPST Switch
F1 4A 250V Fuse
5. The first time you use the circuit, you should check up on it every once and a while to make sure that it is working properly and the battery is not being over charged.

Wednesday, September 17, 2014
4 × 25 W BTL quad car radio power amplifier
 |
| 4 × 25 W BTL quad car radio power amplifier |
Reliable Car Battery Tester
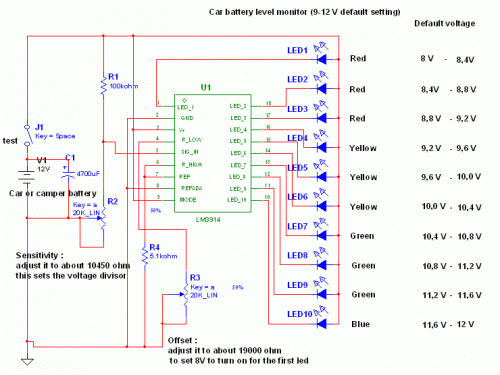
This solution is better than letting the internal voltage regulator set the 12V sample voltage to be feed into the internal voltage divider simply because it cannot regulate 12V when the voltage drops lower (linear regulators only step down). Simply wiring with no adjust, the regulator provides stable 1,25V which is fed into the precision internal resistor cascade to generate sample voltages for the internal comparators. Anyway the default setting let you to measure voltages between 8 and 12V but you can measure even from 0V to 12V setting the offset trimmer to 0 (but i think that under 9 volt your car would not start).
For the first comparator the voltage is : 0,833 V corresponding to 8 V
* * * * * voltage is : 0,875 V corresponding to 8,4 V
for the last comparator the voltage is : 1,25 V corresponding to 12 V
Have fun, learn and dont let you car battery discharge... ;-)
e-mail: jonathan.filippi@virgilio.it
Friday, September 5, 2014

Sunday, August 31, 2014
Find the best stereo for your car
The first thing to do is to check with your family members and friends to see what kind of stereo equipment they have in their vehicles. Referrals are sometimes the best way to find a reliable brand. The next step is to start shopping around in electronic stores to see what brands there are, what kinds of stereos are available for purchase, and what options are available. Be sure to check on what kind of a warranty that each stereo carries. Decide at this point what you want in a stereo and what you do not want. Decide what you would like to have, but what you can live without. For example, do you really need twenty radio preset buttons or can you live with only six? Beware of the extras that you may not need. If you are not going to use them, then do not buy a system with them on it. The more the gadgets, the higher the cost of the stereo, of course. Decide on how much money you can possibly spend. Talk to sales clerks and ask their opinions about the different kinds of stereos. Ask what kind they have in their own vehicles. Ask at each store whether-or-not they are authorized dealers of the products that they recommend. If your stereo needs repaired, can you take it back there and have it fixed?
Ask each sales clerk if they can demonstrate each of the models they carry? Obviously you will want to hear the differences in the stereos before you finally choose one and buy it. Find out if they will install the stereo too. Ask them the exact steps that they would take in order to accomplish the task. Find out if they have any pictures of their work. This especially pertains to the installation of the stereos speakers ans subwoofers. If you purchase a stereo and speakers that are the same size as what you currently have, then the new equipment can simply be put into the same spaces that your current equipment is in. But, if you purchase bigger speakers that will need more space to accomodate them, then these units need to be enclosed first, and then covered with carpet to match your car, truck, or van.
Stereos for your vehicle usually start out with the basic AM/FM radio unit. That is the most basic stereo you can get. Then, there are models that also have cassette players and CD players, etc. Name brand stereos and speakers are probably the better route to take when choosing. You will undoubtedly get a better sound and performance from a name brand that you can trust. Stay away from cheap models that probably sound tinny, muffled, or otherwise unnatural. The cheaper brands tend not to hold up as well as the name brands too.
Finally, the sales people will probably try to talk to you about woofers and tweeters and frequencies, etc. To put it in plain English, the woofer handles the bass frequencies and the tweeter handles the treble frequencies. If you are really interested in this, that is fine. But, if you are not, then that is all you need to know. If you dont understand the lingo of the stereo world, dont let them baffle you with foreign sounding words, technical terms, and other information that you really dont need to know.
Wednesday, August 27, 2014
Car Bulb Flasher
This astonishingly simple schema allows one or two powerful 12V 21W car bulbs to be driven in flashing mode by means of a power MosFet. Devices of this kind are particularly suited for road, traffic and yard alerts and in all cases where mains supply are not available but a powerful flashing light are yet necessary.

Parts:
R1 = 6.8K
R2 = 220K
R3 = 22K
C1 = 100uF-25V
C2 = 10u-25V
D1 = 1N4002
Q1 = BC557
Q2 = IRF530
LP1 = 12V-21W Car Filament Bulb (See Notes)
SW1 = SPST Switch (3 Amp minimum)
Notes:
* Flashing frequency can be varied within a limited range by changing C1 value.
* As high dc currents are involved, please use suitably sized cables for battery and bulb(s) connections.
