Showing posts with label best. Show all posts
Showing posts with label best. Show all posts
Saturday, October 25, 2014
Best Automatic 12V Lead Acid Battery Charger Circuit Diagram
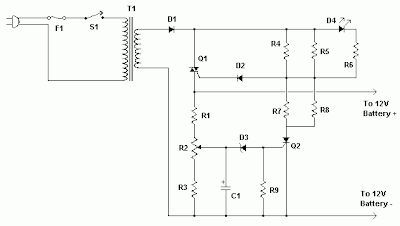
Build a Best Automatic 12V Lead Acid Battery Charger Circuit Diagram. This Best Automatic 12V Lead Acid Battery Charger Circuit Diagram will charge any 12V lead acid battery including flooded, gel and AGM. It is fully automatic and will charge at a rate up to about 4A until the battery voltage reaches a preset point at which it will switch to a very low current float charge.
If the battery voltage drops again the charger will begin charging until the voltage once again reaches the cut off point. In this way it can be left connected to a battery indefinitely to maintain full charge without causing damage. An LED indicates when the battery is fully charged. Sourced By Circuitsstream
Best Automatic 12V Lead Acid Battery Charger Circuit Diagram
Commponents
Notes | R1, R3 | 2 | 330 Ohm 1/4W Resistor | |
| R2 | 1 | 100 Ohm 1/4W Pot | |
| R4, R5, R7, R8 | 4 | 82 Ohm 2W Resistor | |
| R6 | 1 | 100 Ohm 1/4W Resistor | |
| R9 | 1 | 1K 1/4W Resistor | |
| C1 | 1 | 220uF 25V Electrolytic Capacitor | |
| D1 | 1 | P600 Diode | Any 50V 5A or greater rectifier diode |
| D2 | 1 | 1N4004 Diode | 1N4002, 1N4007 |
| D3 | 1 | 5.6V Zener Diode | |
| D4 | 1 | LED (Red, Green or Yellow) | |
| Q1 | 1 | BT136 TRIAC | |
| Q2 | 1 | BRX49 SCR | |
| T1 | 1 | 12V 4A Transformer | See Notes |
| F1 | 1 | 3A Fuse | |
| S1 | 1 | SPST Switch, 120VAC 5A | |
| MISC | 1 | Wire, Board, Heatsink For U1, Case, Binding Posts or Alligator Clips For Output, Fuse Holder |
R2 will have to be adjusted to set the proper finish charge voltage. Flooded and gel batteries are generally charged to 13.8V. If you are cycling the battery (AGM or gel) then 14.5V to 14.9V is generally recommended by battery manufacturers. To set up the charger, set the pot to midway, turn on the charger and then connect a battery to its output. Monitor the charge with a voltmeter until the battery reaches the proper end voltage and then adjust the pot until the LED glows steadily. The charger has now been set. To charge multiple battery types you can mount the pot on the front of the case and have each position marked for the appropriate voltage.
Q1 will need a heatsink. If the circuit is mounted in a case then a small fan might be necessary and can generally be powered right off the output of D1.
T1 is a transformer with a primary voltage appropriate to your location (120V, 220V, etc.) and a secondary around 12V. Using a higher voltage secondary (16V-18V) will allow you to charge 16V batteries sometimes used in racing applications.
If the circuit is powered off, the battery should be disconnected from its output otherwise the circuit will drain the battery slowly.
Q1 will need a heatsink. If the circuit is mounted in a case then a small fan might be necessary and can generally be powered right off the output of D1.
T1 is a transformer with a primary voltage appropriate to your location (120V, 220V, etc.) and a secondary around 12V. Using a higher voltage secondary (16V-18V) will allow you to charge 16V batteries sometimes used in racing applications.
If the circuit is powered off, the battery should be disconnected from its output otherwise the circuit will drain the battery slowly.

Wednesday, October 15, 2014
Best Start up Aid for PCs
Since one of the servers owned by the author would not start up by itself after a power failure this little circuit was designed to perform that task.
The older PC that concerned did have a standby state, but no matching BIOS set-ting that allows it to start up unattended. Although a +5 V standby supply voltage is available, you always have to push a but-ton for a short time to start the computer up again. Modern PCs often do have the option in the BIOS which makes an automatic start after a power outage possible. After building in the accompanying circuit, the PC starts after about a second. Incidentally, the push-button still functions as before.
The circuit is built around two golden oldies: a NE555 as single-shot pulse generator and a TL7705 reset generator. The reset generator will generate a pulse of about 1 second after the supply voltage appears. The RC circuit between the TL7705 and the NE555 provides a small trigger pulse during the falling edge of the 1 second pulse. The NE555 reacts to this by generating a nice pulse of 1.1RC. During that time the output transistor bridges the above mentioned pushbutton switch of the PC, so it will start obediently.

Other applications that require a short duration contact after the power supply returns are of course also possible.
Author : Egbert Jan van den Bussche – Copyright : Elektor
Wednesday, September 17, 2014
Steps AVR Programming a Best Chip
This is a complete AVR Tutorial, including avr programming in a very basic & organized way, We will go through by following items.
- What is an AVR?
- Using Mac and Windows
- How AVR programming works
- Choosing a programmer, to burn the code.
- Using AVRDUDE
Click Here is one for Windows
What is a micro-controller?
The best way to explain what a microcontroller is, is to start with your computer. Your desktop computer (or laptop) is comprised of multiple parts, a CPU (such as a Pentium or Celeron), some RAM, a hard disk, a keyboard and mouse and a monitor Lcd. Programs are stored on the hard disk and run on the CPU, with temporary data stored in RAM. You can run multiple programs at a time by having one ‘master program’ called an operating system (such as Linux, Windows or Mac OS X) and that master program keeps track of things for you.
AVR Programming Chip
The AVR chip has components, too. It has a CPU, some flash storage, some RAM and some EEPROM, all in one little chip!. The CPU is just like the one in a computer, but its much simpler and not nearly as fast (what do you expect for $2.50?) The flash storage is just like the flash storage in your mp3 player or digital camera card, except its used to store programs. Its kinda like the hard disk of the microcontroller, except you can only read from it. The RAM is just like computer RAM. The EEPROM is kinda like flash except you cant run a program from it, but its used as long term storage. The EEPROM doesnt get erased when the chip loses power.
So, to recap: The AVR chip runs whatever program is stored in the flash, uses the RAM for temporary storage and the EEPROM for longer term storage.
Most computers have a 32-bit CPU running at 1GHz, with 1GB of RAM and 100 GB of storage. The kinds of micro-controllers discussed here run at 10MHz, have 1KB of RAM and 10KB of storage. (On the order of) However, their small size, lower power consumption and low cost make them an excellent choice for many projects!
Sunday, August 31, 2014
Find the best stereo for your car
You can find out how to choose the best stereo for your car by reading this informative article!
The first thing to do is to check with your family members and friends to see what kind of stereo equipment they have in their vehicles. Referrals are sometimes the best way to find a reliable brand. The next step is to start shopping around in electronic stores to see what brands there are, what kinds of stereos are available for purchase, and what options are available. Be sure to check on what kind of a warranty that each stereo carries. Decide at this point what you want in a stereo and what you do not want. Decide what you would like to have, but what you can live without. For example, do you really need twenty radio preset buttons or can you live with only six? Beware of the extras that you may not need. If you are not going to use them, then do not buy a system with them on it. The more the gadgets, the higher the cost of the stereo, of course. Decide on how much money you can possibly spend. Talk to sales clerks and ask their opinions about the different kinds of stereos. Ask what kind they have in their own vehicles. Ask at each store whether-or-not they are authorized dealers of the products that they recommend. If your stereo needs repaired, can you take it back there and have it fixed?
Ask each sales clerk if they can demonstrate each of the models they carry? Obviously you will want to hear the differences in the stereos before you finally choose one and buy it. Find out if they will install the stereo too. Ask them the exact steps that they would take in order to accomplish the task. Find out if they have any pictures of their work. This especially pertains to the installation of the stereos speakers ans subwoofers. If you purchase a stereo and speakers that are the same size as what you currently have, then the new equipment can simply be put into the same spaces that your current equipment is in. But, if you purchase bigger speakers that will need more space to accomodate them, then these units need to be enclosed first, and then covered with carpet to match your car, truck, or van.
Stereos for your vehicle usually start out with the basic AM/FM radio unit. That is the most basic stereo you can get. Then, there are models that also have cassette players and CD players, etc. Name brand stereos and speakers are probably the better route to take when choosing. You will undoubtedly get a better sound and performance from a name brand that you can trust. Stay away from cheap models that probably sound tinny, muffled, or otherwise unnatural. The cheaper brands tend not to hold up as well as the name brands too.
Finally, the sales people will probably try to talk to you about woofers and tweeters and frequencies, etc. To put it in plain English, the woofer handles the bass frequencies and the tweeter handles the treble frequencies. If you are really interested in this, that is fine. But, if you are not, then that is all you need to know. If you dont understand the lingo of the stereo world, dont let them baffle you with foreign sounding words, technical terms, and other information that you really dont need to know.
Read More..
The first thing to do is to check with your family members and friends to see what kind of stereo equipment they have in their vehicles. Referrals are sometimes the best way to find a reliable brand. The next step is to start shopping around in electronic stores to see what brands there are, what kinds of stereos are available for purchase, and what options are available. Be sure to check on what kind of a warranty that each stereo carries. Decide at this point what you want in a stereo and what you do not want. Decide what you would like to have, but what you can live without. For example, do you really need twenty radio preset buttons or can you live with only six? Beware of the extras that you may not need. If you are not going to use them, then do not buy a system with them on it. The more the gadgets, the higher the cost of the stereo, of course. Decide on how much money you can possibly spend. Talk to sales clerks and ask their opinions about the different kinds of stereos. Ask what kind they have in their own vehicles. Ask at each store whether-or-not they are authorized dealers of the products that they recommend. If your stereo needs repaired, can you take it back there and have it fixed?
Ask each sales clerk if they can demonstrate each of the models they carry? Obviously you will want to hear the differences in the stereos before you finally choose one and buy it. Find out if they will install the stereo too. Ask them the exact steps that they would take in order to accomplish the task. Find out if they have any pictures of their work. This especially pertains to the installation of the stereos speakers ans subwoofers. If you purchase a stereo and speakers that are the same size as what you currently have, then the new equipment can simply be put into the same spaces that your current equipment is in. But, if you purchase bigger speakers that will need more space to accomodate them, then these units need to be enclosed first, and then covered with carpet to match your car, truck, or van.
Stereos for your vehicle usually start out with the basic AM/FM radio unit. That is the most basic stereo you can get. Then, there are models that also have cassette players and CD players, etc. Name brand stereos and speakers are probably the better route to take when choosing. You will undoubtedly get a better sound and performance from a name brand that you can trust. Stay away from cheap models that probably sound tinny, muffled, or otherwise unnatural. The cheaper brands tend not to hold up as well as the name brands too.
Finally, the sales people will probably try to talk to you about woofers and tweeters and frequencies, etc. To put it in plain English, the woofer handles the bass frequencies and the tweeter handles the treble frequencies. If you are really interested in this, that is fine. But, if you are not, then that is all you need to know. If you dont understand the lingo of the stereo world, dont let them baffle you with foreign sounding words, technical terms, and other information that you really dont need to know.
Subscribe to:
Posts (Atom)
